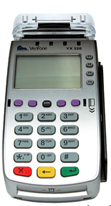
Reference guide for your Verifone VX520 payment device.
- For a printable version of these instructions, click here.
- For setup instructions, please see our VX520 setup guide.
Table of Contents
Retail & Restaurant
Credit/Debit Sale (Swipe/Tap/EMV Insert)
-
-
-
- Select – [SALE]
- Enter Amount – [ENTER]
- Enter Tip Amount – [ENTER]*
- Tap/Insert/Swipe Card - Confirm Amount – [YES]*
- Select Payment Type From List* - Enter PIN – [ENTER]
- Communications
- Remove EMV Card
- Receipt Prints
-
-
*Optional Prompt
Phone/Web Sale
-
-
-
- Select – [SALE]
- Enter Amount – [ENTER]
- Enter Tip Amount – [ENTER]*
- Confirm Amount? – [YES]*
- Enter Card Number – [ENTER]
- Select Payment Type from List* - Enter Exp Date – [ENTER]
- Card Present – [YES] or [NO]
- Imprint Card – [ENTER]
- Enter CID – [ENTER]
- Enter Address – [ENTER]
- Zip Code – [ENTER]
- Communications
- Receipt Prints
-
-
* Optional Prompt
Credit/Debit Refund
Use to scroll, then:
-
-
-
- Select – [REFUND]
- Enter Amount – [ENTER]
- Confirm Amount – [YES] or [NO]*
- Tap/Insert/Swipe Card/Enter Card Number
- Select Payment Type from List* - Enter Exp. Date – [ENTER]
- Communications
- Remove EMV Card
- Receipt Prints
-
-
* Optional Prompt
Void Last Transaction
Use to scroll, then:
-
-
-
- Select – [VOID]
- Void Last Trans? [YES]
- Select to change transaction – [PREV] or [NEXT]
- Select to Void – [YES]
- Communications
- Receipt Prints
-
-
Void Any Transaction
Use to scroll, then:
-
-
-
- Select – [VOID]
- Void Last Trans? [NO]
- Retrieve by? [INV#] or [ACCT#]
- Enter Inv# – [ENTER]
or
Enter Last 4 – [ENTER] - Select to change transaction – [PREV] or [NEXT]
- Select to Void – [YES]
- Communications
- Receipt Prints
-
-
Force
Use to scroll, then:
-
-
-
- Select – [FORCE]
- Enter Amount – [ENTER]
- Enter Tip Amount – [ENTER]*
- Confirm Amount – [YES]*
- Tap/Insert/Swipe Card/Enter Card Number
- Select Payment Type from List - Enter Exp. Date – [ENTER]
- Enter Custom Password – [ENTER]
- Confirm Amount? – [YES]
- Enter Approval Code – [ENTER]
- Remove EMV Card
- Receipt Prints
-
-
* Optional Prompt
Reprint Transaction
-
-
-
- Press the third purple button
- Select – [LAST RECEIPT]
or
Select – [ANY RECEIPT] - Enter Invoice # – [ENTER]
- Receipt Prints
-
-
Batch Review (Totals)
Use to scroll, then:
-
-
-
- Select – [BATCH TOTALS]
- Select to change host – [PREV] or [NEXT]
- Select to confirm – [SLCT]
-
-
Balance/Settle
-
-
-
- Select – [SETTLEMENT]
- Enter Password – [ENTER]
- Detail and total reports print - Enter to confirm – [ENTER]
- Settlement report prints
-
-
EBT Food Stamp/Cash Benefit
EBT Sale
-
-
-
- Select – [SALE]
- Enter Amount – [ENTER]
- Hand terminal to customer
- Swipe Card
or Enter Card Number – [ENTER] - Select – [EBT]
- Select – [FOOD] or [CASH]
- Confirm amount? – [YES]
- Enter PIN – [ENTER]
- Return Terminal to Clerk
- Communications
- Receipt Prints
-
-
EBT Refund
Use to scroll, then:
-
-
-
- Select – [REFUND]
- Enter Amount – [ENTER]
- Hand terminal to customer
- Swipe Card - or Enter Card Number – [ENTER]
- Select – [EBT]
- Confirm Amount? – [YES]
- Enter PIN – [ENTER]
- Return Terminal to Clerk
- Communications
- Receipt Prints
-
-
EBT Voucher Clear
Use to scroll, then:
-
-
-
- Select – [FORCE]
- Enter Amount – [ENTER]
- Swipe Card
or Enter Card Number – [ENTER] - Select – [EBT]
- Confirm Amount? – [YES]
- Enter Approval Code – [ENTER]
- Enter Voucher Number – [ENTER]
- Communications
- Receipt Prints
-
-
EBT Balance Inquiry
Use to scroll, then:
-
-
-
- Select – [EBT BALANCE INQ]
- Hand terminal to customer
- Swipe Card
or Enter Card Number – [ENTER] - Select – [EBT]
- Select – [FOOD] or [CASH]
- Enter PIN – [ENTER]
- Enter Exp Date – [ENTER]
- Imprint Card – [ENTER]
- Return Terminal to Clerk
- Communications
- Receipt Prints
- Select – [EBT BALANCE INQ]
-
-
EMV / NFC
Simple steps to accept EMV chip cards:
STEP 1 – Enter transaction amount before card is inserted
STEP 2 – Have the card inserted chip-first and chip-side up
STEP 3 – Leave the card in the slot until prompted to remove
Note: if card is pulled out before the transaction is completed, then the transaction is cancelled
Simple Steps for NFC / Contactless: (i.e. Apple Pay, Samsung Pay, Google Wallet, Android Pay)
STEP 1 – Enter transaction amount
STEP 2 – When terminal prompts “Insert/Swipe/Tap”, the customer will “tap” their contactless payment device (phone/ smartwatch/ etc.) or contactless card over the green light.
STEP 3 – The terminal will indicate if the “tap” was successful, and complete the transaction.
Still Have Questions?
We're here to help.

