The HPP feature can be accessed via the Modules menu.
Click Add New Hosted Payment Page button in upper-left corner.
You will be routed to the Hosted Payment Page creator. Configure your HPP preferences.
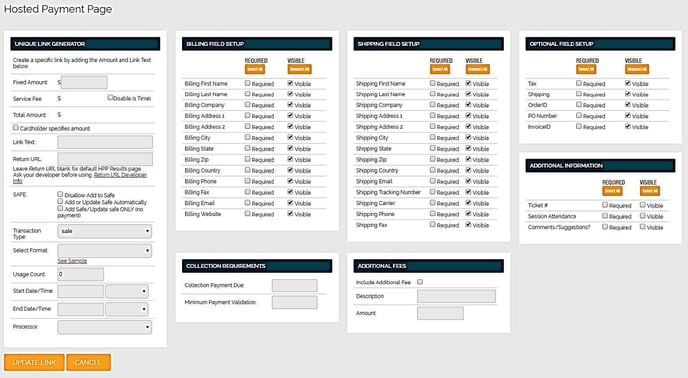
- Unique Link Generator
- Fixed Amount: If using ‘Fixed Amount’ to sell a good, service, etc. (where the price doesn’t vary), enter the amount/price in the Fixed Amount field.
- Cardholder specifies amount: If your amount varies or you wish to use an open amount, so that the cardholder can input their own amount to pay (i.e. donations, collections, pay bills), leave the Fixed Amount field blank and check the box for ‘Cardholder specifies amount’.
- Link Text and Return URL
- Link Text: This is the descriptor you want to use. What is the HPP for? This description is exposed to your customer, so they know what the HPP is for (“Pay Invoice Balance”, “Red T-Shirt”, etc.)
- Return URL: After the customer has made their payment on the HPP, they will want to know the results of the transaction (was it approved or declined). There are 2 methods to notify of the payment results.
- First option is to supply your own custom Return URL. If using a custom Return URL, enter it in this field and your customer will be sent to your URL after the transaction is complete.
- Important: Using a custom Return URL requires added programming. Click Return URL Developer Info to learn more.
- Second option is to leave the Return URL blank and just use the Default Results Page.
- First option is to supply your own custom Return URL. If using a custom Return URL, enter it in this field and your customer will be sent to your URL after the transaction is complete.
- SAFE: The SAFE is our secure tokenization system for storing customer payment data. If you wish to store customer payment data, you have 4 options:
- Disallow Add to SAFE: Disables SAFE functionality. No payment data will be stored from transactions processed from this page.
- Add or Update SAFE Automatically: Enables SAFE functionality. All approved transactions will simultaneously store the customer’s payment data in your SAFE.
- Add SAFE/Update SAFE only (no payment): Enables SAFE functionality without payment. The only action taken will be to store the customer’s payment data and will not process any live transactions to your customer’s account.
- Optional SAFE enrollment (no boxes checked): Leaving all 3 SAFE boxes unchecked gives your customer control of choosing whether they want to save their data in the SAFE or not.
- Transaction Type: Choose what type of transaction you want to use.
- Sale: Most common transaction type. Your customer makes a payment – you’re funded for that payment.
- Auth: Pre-authorization hold only. Auth only verifies funds are available and puts a temporary hold on the funds. You are not funded for an Auth unless you go in to Capture that transaction later.
- Safe Only: No live payment. The only action taken is storing the customer’s payment data in the SAFE.
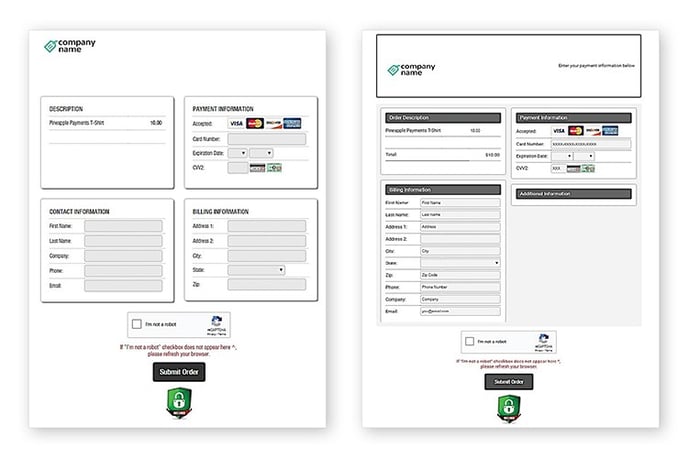
- Format: Choose what page format design you want – Original Format or Format 2. Variation is only in look & feel.
- Usage Count, Date/Time, Processor
- Usage Count: Enable a count that restricts the number of times this HPP can be used. Usage Count is most often used when selling a good that you only have an allotted number in inventory. If Usage Count doesn’t apply for your purposes, leave value defaulted to “0”.
- Start Date/End Date Time: Enable a time-frame that restricts when the HPP can be accessed. If a customer tries to visit the HPP before or after specified date restrictions, link will prompt as being invalid. If date restriction doesn’t apply for your purposes, leave blank.
- Processor: This setting is only applicable to Multi-MID merchant accounts. It controls what Merchant Account the payment is routed to.
- The second set of tiles to complete are Field Setups.
- Billing Field, Shipping Field, Optional Field, Custom Field Setup
- Field Preferences: Choose how you want data fields on your HPP to be used. Think about what type of information you want to collect from your customer.
- Make Required (check both the Required and Visible box)
- Make Optional (only check the Visible box)
- Hidden / Not Used (do not check either the Required or Visible box)
- The last set of tiles to complete are Optional.
- Collection Requirements
- Collection Payment Due: Optional feature to input a suggested collection amount. Typically, only applies to collection-based industries or on charitable HPPs when suggesting a collection/donation amount. If choosing not to use, leave blank.
- Minimum Payment Validation: Optional feature applicable for use on Cardholder Specifies Amount HPPs. This feature allows you to set a minimum payment threshold where a customer must meet this minimum payment amount. If choosing not to use, leave blank.
- Additional Fees: Optional feature. Impose an additional fee to either the “Fixed Amount” or “Cardholder Specified Amount” of your HPP.
- Additional Fees: The Additional Fee is a dollar amount only and not a percentage. To enable, mark the “Include Additional Fee” box, choose a description for your fee, and enter in the fixed dollar amount. If choosing not to use, leave blank.
- Collection Requirements
Once all tiles and fields are specified according to your preferences, click Generate Link button to generate your HPP or Cancel to restart.
Still Have Questions?
We're here to help.